Understanding LRFD
February 27, 2021 • calculations fundamentals
LRFD is a fundamental part of modern structural design. Understanding what LRFD is, and why it was developed, can help you to have a deeper and more intuitive understanding of every part of the design process.
In this article, I’m going to move from the basic definition of LRFD into the statistical underpinnings of the methodlogy.
LRFD stands for Load and Resistance Factored Design. So let’s get started by examining load and resistance!
Load and Resistance
Load is probably the most self-explanatory part. When we’re designing a structural element, we are going to apply some load to it - like the self weight of a beam, or the concrete slab, office furntiure, and people who will be walking around above a beam.
Resistance literally means “the ability not to be affected by something, especially adversely”. In the world of structural engineering, when we talk about the resistance of an element, we mean its ability to stand up to the load we’re going to apply.
A quick visualization: imagine we have a paperweight we want to place on our desk. Also on our desk we have a house of cards, and a lucky brick.
The paperweight is our load. We can easily imagine the house of cards collapsing under the paperweight; it has inadequate resistance. The brick will easily support the paperweight; it has adequate resistance.
Mathmatically, we put the load over the resitance and call this ratio the utilization.
A utilizattion less than one (u<1) means the element has capacity to support the load. A utilization greater than 1 (u>1) means the element’s capacity is less than the load applied, and we will see some type of failure.
We can look at the utilizations from our paperweight example like this:
\[{paperweight \over brick} < 1 < {paperweight \over house-of-cards}\]Now that we have a handle on loads and resistance, let’s take a look at factors.
Factored Design
Now we can talk about the factors in LRFD.
The factors used in LRFD are applied to both the loads and the resistance.
We apply factors to account for the fact that we don’t precisely know the loads that will be applied or the resistance our element will have.
For example, our paperweight may weigh a bit less than it is supposed too, or a bit more.
To account for the variability in the loads, we apply a factor to adjust them. We use a factor that produces a worse effect on the structure. This can mean increasing the loads, or decreasing them. For example, we might increase a snow load, because more snow on the beam will be worse. But we might actually decrease the dead load when we’re looking at wind load, since the dead load will help resist the uplfit caused by the wind.
Just as the paperweight may be heaveir or lighter than the design weight, our spaghetti noodle may be a bit thicker than normal, or a bit thinner. Our brick may be very solid, or it might have a chipped corner.
To account for the variaiblity in the resitance, we apply a factor to adjust the resistane of a given element. The resistance factor is always less than one (ɸ<1), because we always want to use a resistance on the lower side of what the element will have.
Eight Tips for Better Engineering Calculations in Excel
February 24, 2021 • calculations excel
I’ve heard it said more than once - Excel is the world’s most widely used programming environment.
This certainly matches with my experience. Everyone has excel, it can do math, and it is pretty easy to format things to print on the page.
Personally, I think Excel is limited at best as an engineering tool. The lack of unit awareness and difficulty in creating “user commentary” are some of my key concerns about developing calculations with this tool.
Nevertheless, most of us will end up creating calculations in Excel at some point. So below are some of the simple steps I recommend for creating Excel calculations which are easier to read, update, QC, and re-use.
Label things clearly
Show clearly what is an input, what’s a calculation, etc. using headings or other means.
Use cell styles
Cell styles help to visually differentiate what is going on with your sheet. Excel conveniently has many built in styles & labels to make it easier to consistently select the same styles for the same type of information. You can also modify these if desired.
Here I’ve added a heading style, input style, and explanatory style. We can see that this already helps to differentiate what I’m communicating about these values
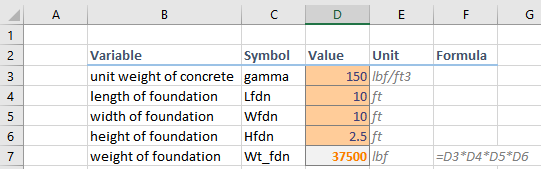
Name variables - use Unicode and subscripts
Say we want to perform a calculation using the unit weight of concrete. By naming our cell, we can make our calculations much clearer.
Using Unicode also makes our names more succinct, and lets them better match the code / design references. If you put the symbol to the left of the value, when you right click to name the cell it will automatically use the values in the adjacent cell.
compart is a simple way to find relevant Unicode characters - you can search by spelling things out, like “gamma”, and then copy over the relevant symbol to excel.
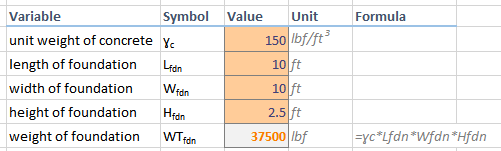
Use =FORMULATEXT() to display equations
A huge benefit of using Unicode to name variables is that your formulas will now be human readable, even when printed and cell labels are not available.
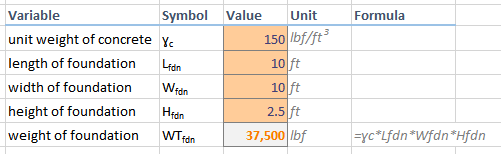
I strongly recommend using FORMULATEXT vs writing out what an equation is supposed to be by hand, because with the latter it is possible to correct what is displayed, but not the actual math being performed.
Apply number formats appropriately
Allow the thousands separator, and adjust the number of significant figures as appropriate for your calculation.
Include figures
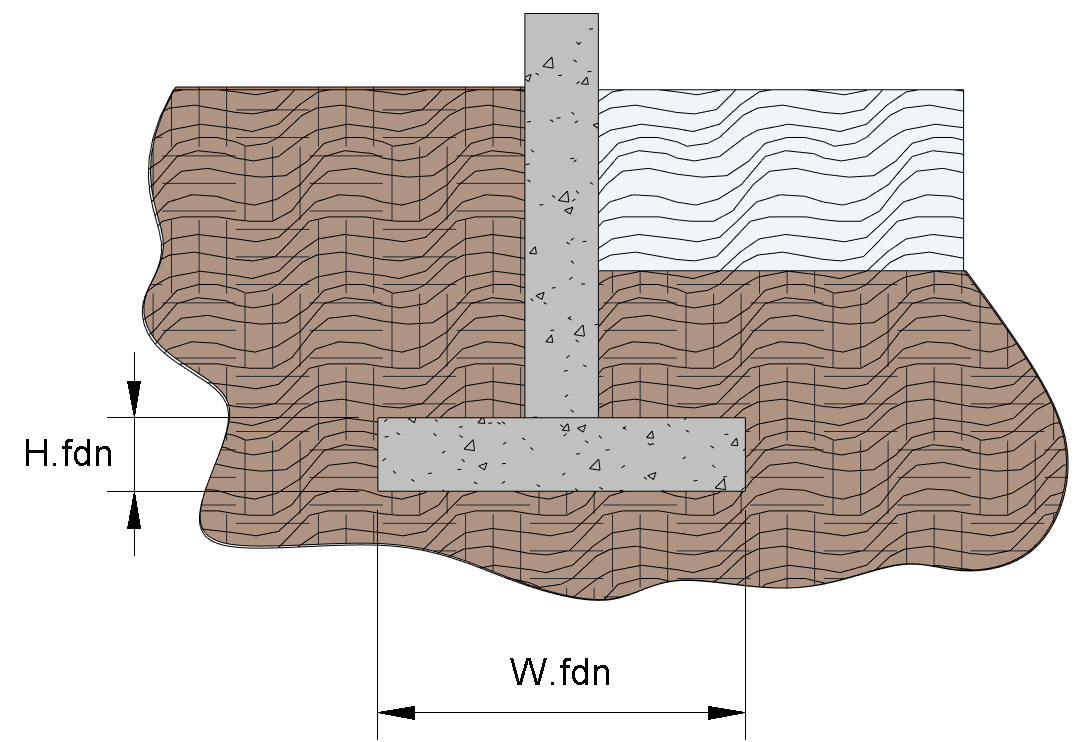
There are a few ways to approach creating figures in Excel.
One method I have used is creating figures in Revit, often just using filled regions. I’ll rename dimension strings in Revit to match the symbols in Excel. You can’t do subscripts in Revit’s dimension strings, so the formatting won’t match exactly.
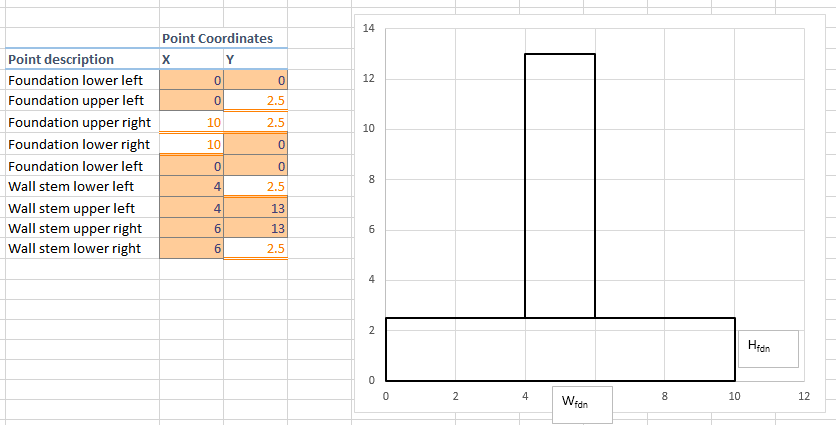
Another possible method is by producing graphs in Excel itself. This is something I’ve seen done more than I have actually performed myself, but it would look something like what I’m showing below. The big thing I haven’t worked out with this method is how to nicely label the dimensions / variables in the graphic I’ve created.
Use groups
Sometimes in Excel it can be helpful to break more complicated logic down into smaller steps. However, these smaller steps are not always appropriate / relevant to include for the printed document.
One way I have found to manage these steps is to use the Data → Group function in excel. This allows you to “group” a number of rows or columns together, and quickly collapse or expand them as needed. I’ve used this to create more detailed logic in the appropriate place in a spreadsheet, and then collapse. This helps with future use / reuse because all the logic is one place, and fits into the normal “flow” of the spreadsheet, but can still be hidden when it isn’t relevant to include.
I’ve used this is for looking up the required factor of safety for sliding based on the structure information and the EM 1110-2-2100 Tables 3-2 and 3-3. As you can see below, I’ve reproduced the information from Tables 3-2 and 3-3. I use user inputs of the structure information to perform a lookup and return the minimum FS.
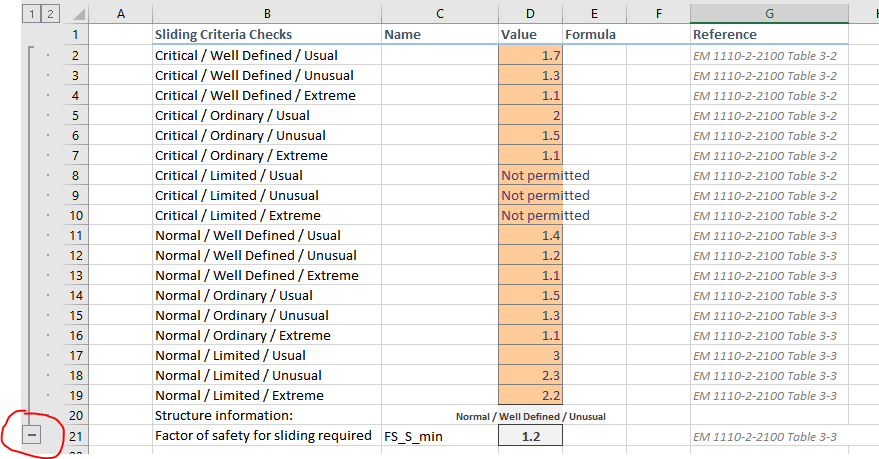
That minus symbol in red is the group, and when collapsed all that is visible is the relevant output and table reference.

Break things up across sheets
Another general practice I’ve adopted in excel is to try and keep information on a single sheet to what will fit on a single page.

I’ve found that if a calculation is getting longer than a single page, it is helpful to break it up into parts and use the sheet names to help make the calculation easier to navigate.
This also helps avoid producing spreadsheets which are very large and have inputs which can be missed if you don’t scroll over or down far enough to see relevant inputs. I’ll often have a summary tab, an inputs tab, sometimes a separate elevation input tab, and then relevant calculation tabs as required.
What to pack in your field kit
February 14, 2021 • field work gear
A well-packed field kit is critical to having a safe, comfortable, efficient, and non-embarrassing field experience. The first time I had to pack for an inspection I was running around like a chicken with its head cut off. In the time since then, I’ve accumulated a field kit that I can now basically grab and go for most inspections. Below are some of the items I’ve added to my field kit over time.
Stuff for taking notes
Clipboard. Can be 11x17 sized or 8 1/2x11 sized. Get the box type, which will allow you to keep pens, drawings, and extra paper inside.
Magnet. A big magnet stuck inside your clipboard will let you stick the whole thing to the side of a manlift, guardrail, or wall when you need to free up your hand
Pens. Choose a type that won’t run if the page gets wet. No matter how dry the site is supposed to be, your notes are going to get wet. Bring multiple colors, as this will help make your sketches & notes easier to follow. I’ll have one color for datum, one color for elements, and a color for dimensions.
Paper. If your company has paper with letterhead, choose that. A grid is also helpful. So is a header with space for information it is important to capture, like date, page number, and total page count
Write in the rain paper. Not as pleasant to write with, but good to have in case things get really damp.
Existing drawings and/or blank sketches. If you have some idea of what you’re going to be documenting, it can be really helpful to have a set of existing drawings you can use to orient yourself. For taking notes, I prefer a ‘blank’ sketch I’ve created myself, free of extraneous detail, and often at a larger scale. For example, if you’re inspecting a pier, having a pre-drawn elevation of the pier you can mark up with photo #s is more helpful than an elevation already cluttered with rebar layout information that you won’t be able to verify anyways.
Photo log. No matter how many times I’m convinced I’ll be able to reconstruct what I need from my pictures and my notes, I usually wish I had a detailed photolog explaining all my pictures.
Stuff for in the field
I’m skipping over all the typical PPE, but yes, bring your PPE Gloves. Some people don’t count them as part of standard PPE, but in IMO you should always have a pair.
Emergency contact info for the client and your company A solid bag. One with pockets, pouches, or some other form of internal organization is helpful so you’re not constantly rooting through the whole thing.
Flashlight
Headlamp - one meant to go over your hardhat is best
Grease pencil or lumber pencil for marking up stuff
Camera
Measuring tape - the kind that you press a lever to retract
Laser measuring tape
Calipers
Scraper
Chipping hammer
Sounding hammer
A longish stick. Sometimes you need to knock shit out of the way, or attach a light to the end of something. A longish stick comes in handy more than you’d think.
Knee pads or kneeling mat
Bio needs
Water
DripDrop ORS
Kleenex / handkerchief
Food - MealSquares, CliffBars, or similar.
Field clothes. I keep jeans, a long-sleeved shirt, jacket, and extra socks in my field kit at all times, so if I’m in business casual at the office and get an urgent call I can easily get geared up.
If you’re going to be somewhere remote, gear for relieving yourself. TP, trowel, hand sanitizer or wipes. If you could use one, a pStyle or similar stand-to-pee device.
If it is going to be cold
Helmet liner
Neck warmer / turtle fur
Hand / foot warmers. There are fancy battery powered ones, I usually just use the disposable chemical ones.
Jacket. I keep a separate work jacket with my field gear so my nice ones don’t get trashed on job sites.
If it is going to be wet / rainy
Foul weather gear / bibs / waders
Extra changes of clothes
Wear proper insulating materials, don’t be wearing cotton underneath your bibs.
Stuff for storing the whole damn lot
I have what I believe is a Husky “stackable storage bin” that I keep my field gear in. It is just the right size to fit in the trunk of my hatchback, and holds my field bag, steel toes, hardhat, jacket, and fall protection. (If you store your own fall protection, make sure it is getting turned in on the prescribed basis for a qualified inspection.)
The beauty of having this one bin that hold all my kit is being able to move it easily between my office, house, car, and hotel. I can drop the whole thing on a hotel trolley and bring it up to my room, or just hold it and carry it wherever it needs to go.